Showing posts with label Quickbooks Tips. Show all posts

Monday, November 28, 2011

QuickBooks Tips & Tricks: Capped Sales Tax Procedure

How can I handle a capped sales tax amount in QuickBooks? Many states, including Florida, have county sales tax rates that cap at a certain amount and then are not charged on the amounts that exceed the ceiling. For example, Escambia County in Florida does not charge the county surtax of 1.5% on amounts over $5,000.00 included in one sales transaction. If a customer has an invoice totaling $6,000.00 and is subject to the Florida State and Escambia County tax rates, the sales tax rates that apply would be 6% on the full $6,000.00 and 1.5% on the $5,000.00 or $75.00.

QuickBooks does not have a method set up to automatically handle these capped sales tax amounts. There is a simple workaround that is very effective in dealing with this problem. The first step is to create two sales tax items: a Florida Sales Tax with a 6% rate and an Escambia County Capped Sales Tax with a 0% rate. If you do not already have a subtotal item you will need to set that up as well.

To create a subtotal item, open the Item List and right click. Select “New” from the menu options and select “Subtotal” for the item. Type the word “subtotal” in the Item Name/Number and Description areas. Then click on “OK”.

Next, create the customer invoice. At the bottom of the invoice select a Non-Taxable sales tax code. You may have to set this up if you do not have one already. Select the items being sold to the invoice as you normally would. Make sure each individual line with the items being sold is “Taxable”. When all items have been entered, on the next invoice line enter the subtotal item. This will total all the lines above it. In the example below the total is $6,000.00. Under the subtotal, enter the Florida State Sales Tax item with the 6% rate. This will charge the correct state rate on all items sold.

Underneath that line, enter the Florida Capped Sales Tax with a 0% rate. You can then manually type in the capped amount of $75.00. QuickBooks will warn you that you should not change a sales tax rate but that is the purpose of this workaround so you can close the error message.

The invoice will now have the correct sales tax charged and it will flow through automatically to the correct liability account. There is no need for manual calculations on the invoice because the state rate will calculate automatically with the sales tax item used and the capped county surtax amount you already know is $75.00.

This is an example of an issue that it would be worth bringing to Intuit’s attention. Under the “Help” option on the grey menu bar there is an option to “Send Feedback Online”. You can ask for a capped sales tax procedure as a “Product Suggestion”. Intuit does listen to customers and if enough people bring an issue to them they will respond. This is why there are updates/patches during the year that you can download.

Review the samples below and if you have questions, please call any of our QuickBooks ProAdvisors at (850) 435-8300. If you have any other QuickBooks questions or problems we will be happy to help you solve them.

Example of an Invoice with Capped Sales tax amount:


Sales Tax Liability report:


**These tips are based on the 2011 version of QuickBooks.

Tuesday, November 15, 2011

QuickBooks Tips & Tricks: How can I change the look of the forms in QuickBooks?

Intuit has updated the way you can customize forms in QuickBooks.  You now have two options for customization that you can use together to make changes to your forms.


If you choose the second option, “Customize Data Layout”, it will take you to the customization options you are used to seeing in QuickBooks as shown below.

The viewing pane on the left allows you to select the fields that will appear on your form either on-screen and/or on the printed form. For example, on the screen shot above, the “REP” field is selected only to show on the screen. This field will only be visible when you are filling out the invoice. It will not print on the hard copy of the invoice itself. This allows you to specify what your customer sees and reduces the clutter on the form.

 The second tab allows you to select which columns will appear on screen or on the form. You can also change the default title for fields such as “service date” to “serviced”. The order column determines the position of each column on the form. The item field is selected to show only on-screen so the first printed column on the hard copy of the invoice is the “description”.

The “Prog Cols” and “Footer” tab provide the same print and order option for Estimates, Sales Orders and the Footer.

On the final tab you can set printing options for the form. The default is to use the settings from the Printer Setup but you can choose to set a different orientation, copies etc. for this form including customizing the paper size.


The Basic Customization screen options allow you to change the font for field descriptions; apply a color scheme and select which company and transaction information will print on the form.

By selecting the Layout Designer button on the bottom of the screen, a window opens that shows the invoice as a grid with the fields currently used positioned on the grid as they appear when printed. 


You can move, resize or delete the fields by selecting them one at a time; or clicking into the grid and holding the left mouse button down, then circling the fields you want to modify. When you release the mouse button the circled fields will be selected. You can move them as a group to another position on the form or delete them.

 If you select the first customization option, “Create New Design” this will take you to the Intuit on-line QuickBooks Forms Customization. This expands your customization options. You can add a company logo or select a background as well as upload your own personal background.


Step two will customize the colors, fonts and company information that displays as shown below.
Step three customizes the grid style for your form and how it will print on the hard copy. 
 

Step four shows the final result of your customizations.  At this point you can confirm the final copy and apply it to your form.  It will require you to sign in with the username and password you set up for your Intuit account when you installed the software.


The advantage to using this customization option is that you have many more choices available on-line from Intuit and from other users like you who are happy to share their set up.

 If you would like help on setting up these forms, please call any of our QuickBooks ProAdvisors at (850) 435-8300. If you have any other QuickBooks questions or problems we will be happy to help you solve them.


**These tips are based on the 2012 version of QuickBooks.

Tuesday, November 1, 2011

QuickBooks Tips & Tricks: How do I get the technical information on my QuickBooks installation?

There are two screens accessible from within QuickBooks that will provide the technical information on your installation.  The first is the Product Information Screen.  You can access this screen by pressing the “F2” function key on your keyboard while in QuickBooks.  The following Product Information will come up:


This screen will provide you with your registration and product numbers for the installation.  It will also record all the release updates that are installed from the first to the latest.  These are the Automatic Updates Intuit periodically sends.  When there is a new release available, at your next logon to QuickBooks you will receive a message that there is an update to install.  It is a good idea to install these updates as they are provided to fix problems that users like you bring to Intuit’s attention.  All during the year Intuit is reviewing and testing the current version of QuickBooks to make sure it provides the best features to help you in your business.  These updates are valuable tools to help you keep QuickBooks functioning at its best.
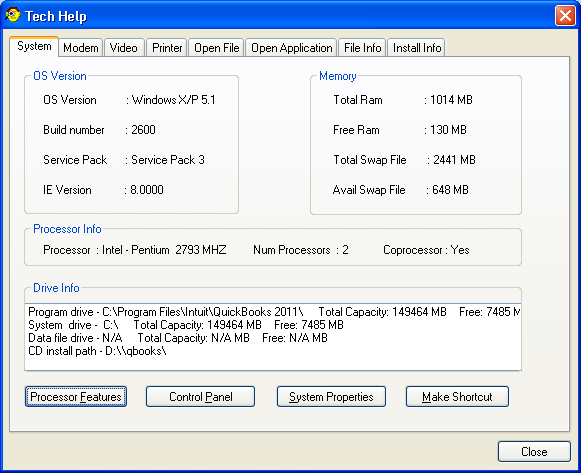
The second screen to provide technical information is the Tech Help screen.  You can access this information by first bringing up the Product Information screen from the F2 function screen.  When that opens, press your F3 function key and the following Tech Help screen appears.

The first screen will give you the system information for this installation of QuickBooks.  This will be helpful when you call our QuickBooks Pro-advisors for support.  Software processing is very dependent on the surrounding hardware and operating system environment.  When problems come up it is essential to have as much information available to help solve the problem.  The other tabs on this screen provide additional information to help with your support as well.
One of the most important screens is accessed by the Open File tab.  This gives you access to various log files generated as you process your work in QuickBooks.  If you receive an error message or you are having problems with transactions this screen will provide event information on what happened and when.  The “QBWIN.LOG” file shown below will open as a text file and lists any exceptions that occurred during processing.


For more information and help on the technical side of QuickBooks, please call one of our QuickBooks Pro-advisors at (850) 435-8300. We will be happy to help keep your QuickBooks processing smooth.

Thursday, October 20, 2011

QuickBooks Tips & Tricks: What is the best backup to use and how often should I backup?

Most people do not think about backup files until they need one in an emergency. That is when they discover whether they have done backups frequently enough.
The best way to determine how often to backup is to think of a system crash. How much data entry do you want to have to redo? If you process many transactions in one day then a daily backup is in order. If you go several days without processing then a weekly or biweekly schedule is appropriate. Make sure that you backup often enough that any data entry needed after restoring from your most recent backup is minimal.

QuickBooks 2011 offers several types of backups. Under File>Create Backup on the Menu Bar you can select to create a full backup. This includes all program and data files. The first screen gives you the option to create a local (on your system) backup or if you have purchased the on-line backup you can backup to Intuit’s server. Most often you will be selecting the local backup.


The options button allows you to select where to save the backup file as shown below.

Use the browse button to select the place to store your backup. You can select your hard drive but this won’t help in the event you have a system crash. The best option is to save to an external drive; a thumb drive, CD or other external hard drive.
You can then setup the other options on the screen and save them for future backups. The next screen allows you to backup right then, or save the backup schedule and also do a backup, or just schedule future backups. Remember that this backup file will be big; it includes program files and data files.

Other backup options are available under File>Create Copy on the Menu Bar.
 
 
The full backup option is available here as well but one of the best options is the Portable Company file. It is named portable because it is a smaller file that just backups the data files. This means you can sometimes email a portable file if the original file is not too big. You can save it easily to a thumb drive and work on it from another location as long as no one will access the original file and make changes. You can’t merge portable or backup files into the original file. You would have to overwrite the original with these backups.

The other option is to make an Accountant’s Copy which can be merged back into the original file. This is used to send the file to your accountant for review which will keep transactions in the review period from changing in the original file. It sets a closing date that will not allow changes to be made before that date. When we send the transfer file back you can import all changes that were made while you continued to work in the original file and the closing date restrictions will be lifted.

Please call any of our QuickBooks ProAdvisors if you would like more detail on these tips or if you have any other QuickBooks questions. (850) 435-8300

**These tips are based on the 2011 version of QuickBooks.

Friday, October 7, 2011

QuickBooks Tips & Tricks: What’s new in QuickBooks 2012?

In September or October each year Intuit releases a new version of their QuickBooks software. They improve many existing features and add others for the first time. Many of these changes are a direct result of feedback from users like you. That is why it is important to let them know about problems or suggestions you have using the options provided with the “Send Feedback Online” under the “Help” option on the grey menu bar.
The following is a quick rundown of the new features for QuickBooks 2012.

1. There is now a calendar you can access from within QuickBooks. Under the View option you can add a calendar icon to the icon bar. It is also accessible under Company on the menu bar. What do you get with this new feature? The calendar will track the transactions entered and due. You can also add To Do items here and track any appointments. Under the “Show” drop down you can select from every type of transaction QuickBooks processes to refine your view. It is an easy way to get a picture of your daily activity by day.

2. The Excel export now allows you to update existing reports with new data. When you click on the “Excel” button on the report menu bar, you are given the options to either create a new worksheet or update an existing one. If you choose to update, the following screen will appear:


Simply browse out to the report you want to update, select the correct worksheet and click on the Export button. QuickBooks will update the existing report with new data. Be aware that it may take some time for the update to complete depending on the complexity of the report and how much new data there is.

3. If you use memorized transactions to enter your recurring transactions (and you should to save time – ask us how if you’re not sure what to do!) you now have the option which transactions to enter when you open your file and which to postpone until a later time. You also see individual transaction detail so you can decide which transactions to enter at that time as shown below.


4. QuickBooks has upped the technological component with 2012.  You can now scan from within the program.  When you click on the Docs icon or the Attach button when in an invoice or other form, the pop up window below appears:


After you click on the scan option, the QuickBooks Scan Manager will open. QuickBooks then links to your attached scanner and begins the scan process. When it is completed you can attach the document. In addition to the scan feature, you still have the option to attach files from your computer and the document center.

5. There is a new Lead Center in QuickBooks that helps you track new contacts. You can access this center under “Company>Lead Center” on the menu bar. You can manually enter leads directly in the lead center or import a list from Excel. The center will keep all your leads organized and you can convert a lead to a customer when you land the business.

6. You can now create a credit memo from the original invoice. This saves time and possible errors because it will enter the item data from the original invoice when you click on “Create>Credit Memo” for this Invoice. You can delete or edit lines in the credit memo as needed.

7. There is a new category in the Report Center called Contributed. This section allows you to browse reports created by other users and Intuit that are not included as standard reports. In addition to viewing the reports you can read the details of report set up and any reviews that other users submit. You have the opportunity to rate the report and can add it to your favorites tab in the report center.

Now if you create a report that meets a particular need you have in your business it may also meet the needs of other QuickBooks users and you can share it with them. On the report menu there is a new button “Share Template”. It becomes active after you modify a report. When you click to share the report the window shown below opens.

This first tab is the basic information for the report. Notice that you can share this without using your name if you choose. The email address is for Intuit to contact you if they have any questions.

The second tab in the window is shown below. It allows you to select the category for the report and to indicate what industries might be interested in using it.


Please call any of our QuickBooks ProAdvisors if you would like more detail on these tips or if you have any other QuickBooks questions at (850) 435-8300.


**These tips are based on the 2012 version of QuickBooks.

Friday, September 2, 2011

QuickBooks Tips & Tricks

What is the best way to avoid making mistakes when processing transactions? The best and easiest way to avoid common mistakes in transaction processing is to use the Home Page. In QuickBooks 2006, Intuit combined all the old navigator pages into one Home Page. This page is an excellent visual guide to help you decide how to go about generating your transactions.

 The golden rule is to NEVER cross the lines on the Home Page. For instance, if you enter a vendor bill, do not cross the lines and go to Write Checks to print the check for that bill. Always follow the line from your starting point, Enter Bills, to the next step, Pay Bills.


If you enter a bill and then use the Write Checks option to pay it, you will double your expense and your Accounts Payable account will continue to grow.
If you use the Pay Bills option to generate your vendor checks as shown below, you will reduce the balance of your payable account and the expense will only be recorded through the Bill you enter.


This rule of thumb works for each section on the Home Page including the Customers and Employees centers. If you follow the lines like a map you will reduce the number of errors that occur when processing transactions in QuickBooks.

 Please call any of our QuickBooks ProAdvisors at (850) 435-8300, if you would like more detail on these tips or if you have any other QuickBooks questions.

Wednesday, August 17, 2011

QuickBooks Tips & Tricks

Why do I have Accounts Receivable/Accounts Payable balances on my cash basis balance sheet (CBBS)? There are several reasons this may occur. If you have a transaction that is linked to a balance sheet account instead of an income or expense account, that transaction will appear as an open invoice or bill in Accounts Receivable or Accounts Payable. If you enter an invoice or bill and then enter a deposit without a payment or write a check instead of creating a bill payment, the transactions will not have a link to clear their balance and these transactions will also appear on the cash basis report as open transactions.

To fix these problems there are some reports you can run that will identify the transactions that need to be cleared.

Open Invoices report

1. Choose Reports > Customers & Receivables > Open Invoices.
2. Click the Date drop-down arrow and select the correct date.
3. Click Modify report, Advanced, and then click As of Report Date.

The payments that appear on the report (included in the CBBS) have been received but not applied to an invoice.

Unpaid Bills report

1. Choose Reports > Vendors & Payables > Unpaid Bills Detail.
2. Click the Date drop-down arrow and select the correct date.
3. Click Modify report, Advanced, and then click As of Report Date.

The bill payment checks that appear on the report (included in the CBBS) have been entered but not applied to a bill.

Customer Transaction Detail report

Each customer with a nonzero subtotal is affecting your A/R balance. To identify customer transactions that are causing an A/R balance to show on your CBBS, run the following report:

1. Choose Reports > Company & Financial > Balance Sheet Standard.
2. Click Modify Report.
3. On the Display tab, for Report Basis select Cash.
4. Delete the From date, keep the To date, and click OK.
5. To bring up the Transactions by Account report, double-click (QuickZoom) the A/R amount.
6. Click Modify Report.
7. On the Display tab, delete the From date and keep the To date.
8. Click Advanced, select the Open Balance / Aging Report Date option, and click OK.
9. Select Customer in the Total by field.
10. Click the Filters tab:
           a. In the Filter list, click Account.
           b. Click the Account drop-down arrow and select All Accounts Receivable.
           c. Select No for Include Split Detail.
           d. In the Filter list, select Paid Status, select Open, and then click OK.
           e. (Optional) Click Memorize to save this report to use again.

Vendor Transaction Detail report:

Each vendor with a nonzero subtotal is affecting your A/P balance. To identify vendor transactions that are causing an A/P balance to show on your CBBS, run the following report:

1. Choose Reports > Company & Financial > Balance Sheet Standard.
2. Click Modify Report.
3. On the Display tab, for Report Basis, select Cash.
4. Delete the From date, keep the To date, and click OK.
5. To bring up the Transactions by Account report, double-click (QuickZoom) the A/P amount.
6. Click Modify Report.
7. On the Display tab, delete the From date and keep the To date.
8. Click Advanced, select the Open Balance / Aging Report Date option, and click OK.
9. In the Total by field, select Vendor.
10. Click the Filters tab:
       a. In the Filter list, click Account.
       b. Click the Account drop-down arrow and select All Accounts Payable.
       c. For Include Split Detail, select No.
       d. In the Filter list, select Paid Status, select Open, and then click OK.
       e. (Optional) Click Memorize to save this report to use again.

Please call any of our QuickBooks ProAdvisors at (850) 435-8300, if you would like more detail on these tips or if you have any QuickBooks questions.